





Myriam HINDERER
Chief Marketing & Communication Officer
2026-07-13
How to create animated captions automatically with AutoCut (2026 Guide)
Is there a way to create animated captions in Premiere Pro automatically? I've asked myself this so many times lately. Animated captions are increasingly replacing static subtitles, especially on social media, and keeping up with that shift really matters.
Summarize content with
 Chatgpt
 Mistral
 Gemini
 Perplexity
Native manual Premiere Pro method
If you're reading this article, chances are you've been doing it the same way I used to.
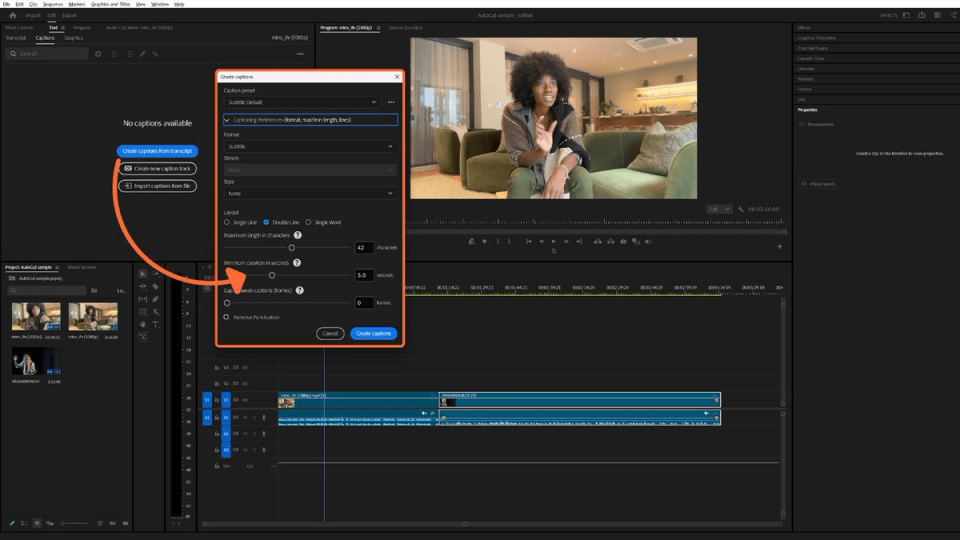
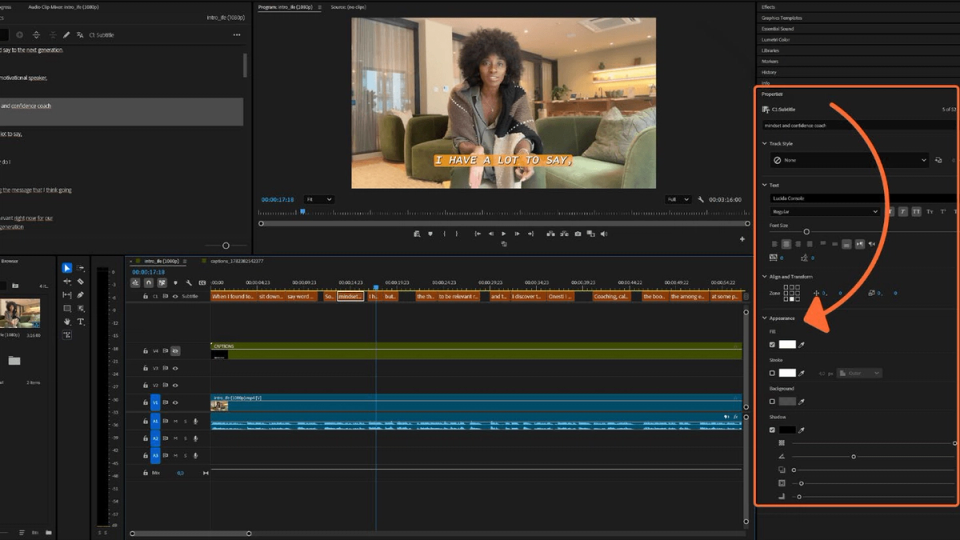
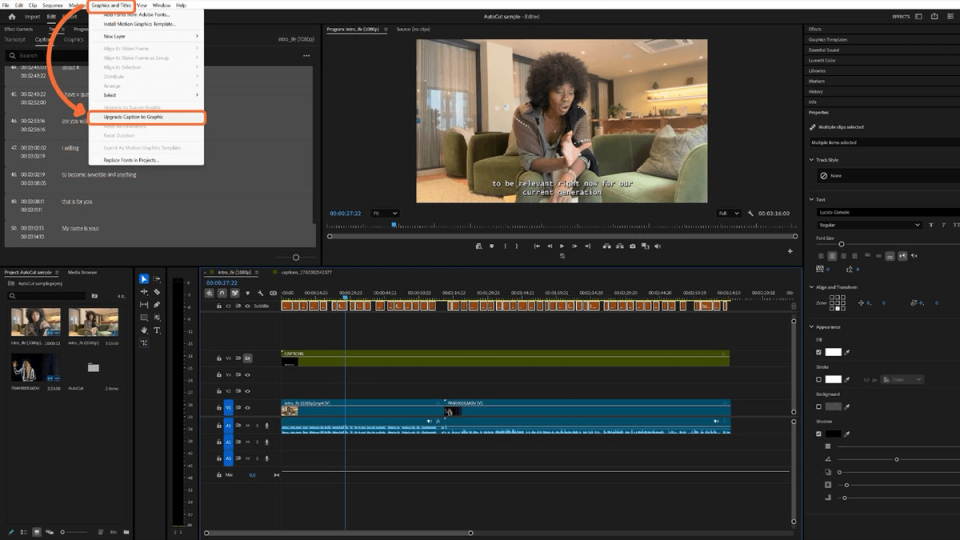
You'd generate automatic captions from the transcript, set the language, line length, and number of lines, then go through and fix any errors in the text and timing. After that, you'd convert the caption track into Essential Graphics, animate everything with keyframes and, depending on the effect you wanted to create, break it down further word by word.
Limitations of the manual method
This method works well and is 100% customizable.
In short, it works, but it’s quite time-consuming. We estimated about half an hour for a one-minute video. For slightly longer videos, you just need to run a few numbers, and it quickly becomes clear how much time you might waste trying to get a good result.
It’s also important to consider that creating social media content must keep up with an increasingly fast-paced consumption pattern, which requires time and consistency. A slow workflow doesn’t align well with this or with frequent content, which is essential for building loyalty among a specific audience.
How to create animated captions automatically with AutoCut
AutoCut makes this super easy, and you don’t even have to leave Premiere Pro.
With just a few clicks, you can choose the style you want: the type of animation, the font, the color, the length, and the size. It’s exactly the same as doing it manually, except that AI steps in to help you automate the entire process once you’ve chosen your preferred settings.
Let’s walk through step by step how to set it up and how it works.
Step 1
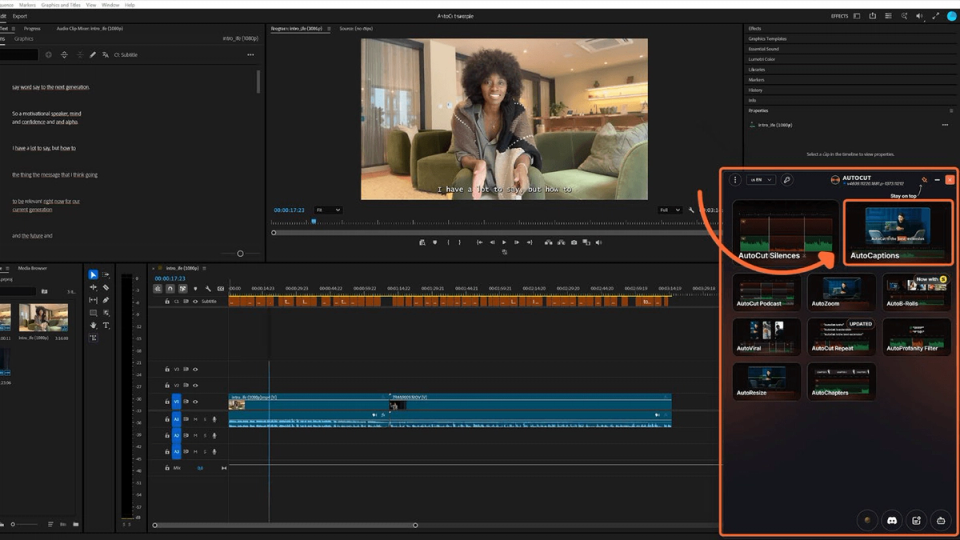
Once you've installed AutoCut and activated the license key, open AutoCut in Premiere Pro by going to "Window > Extensions > AutoCut".
This will open the plugin interface directly in Premiere Pro.
Step 2
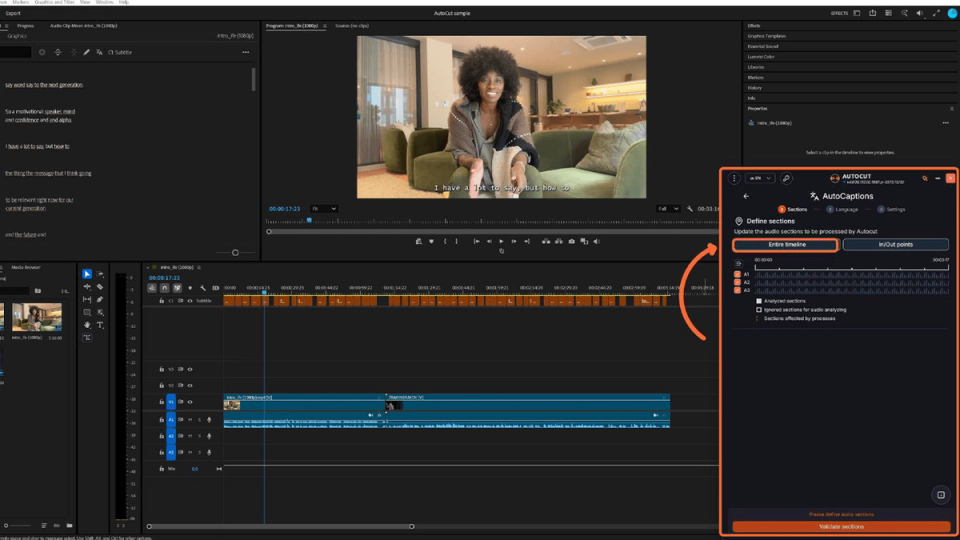
Select the AutoCaptions feature and choose the audio track you want to transcribe.
Step 3
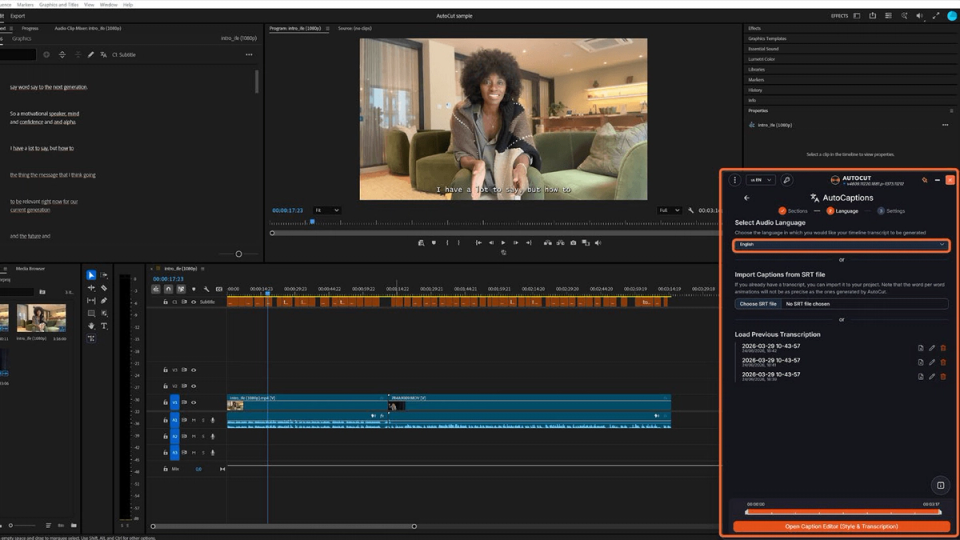
Select the language to generate the transcript and subtitles, or upload an SRT file if available.
AutoCut is compatible with 80+ languages and has the best transcription model.
Step 4
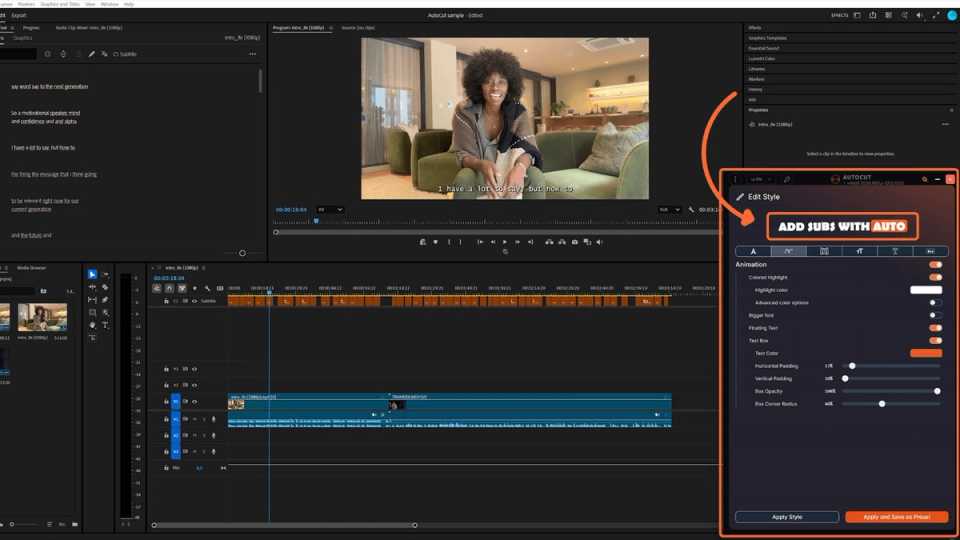
Select a preset from the available options and customize the style and type of animation.
Step 5
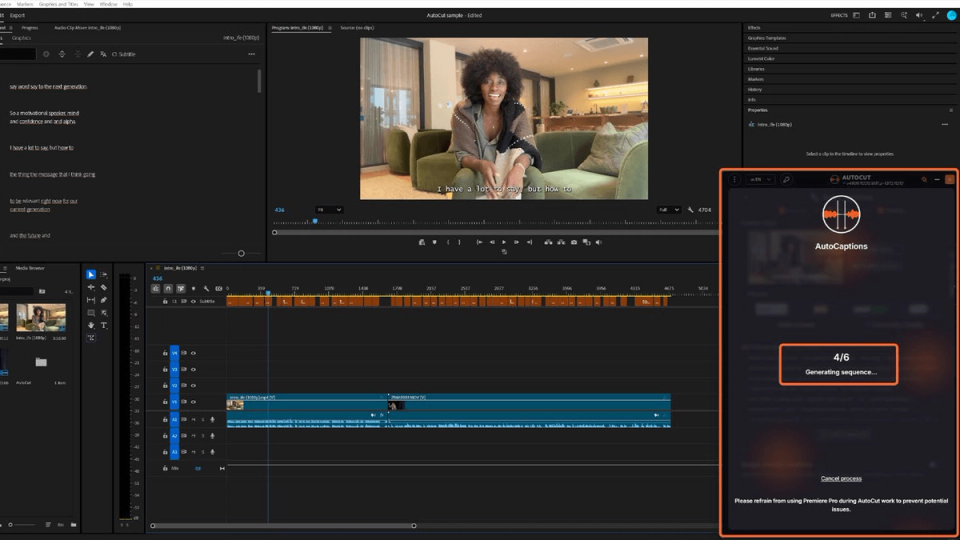
Check the result in real time and edit it as you like, then generate it automatically in just a few seconds.
Step 6
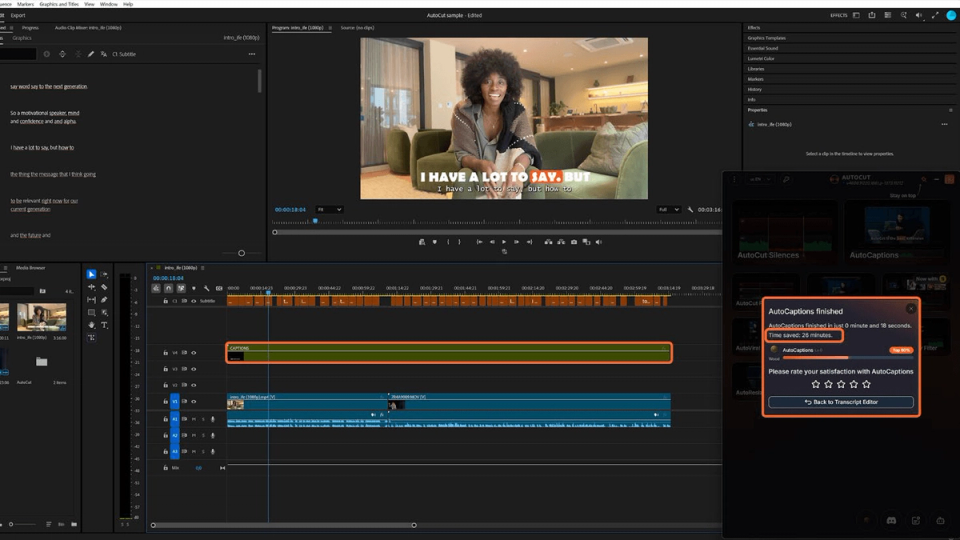
And just like that, everything is ready in just a few clicks and in less than a minute.
A subsequence containing the animated captions is imported into your current sequence. You can then double-click it if you want to edit it. It uses native text and shapes, so you can easily customize it.
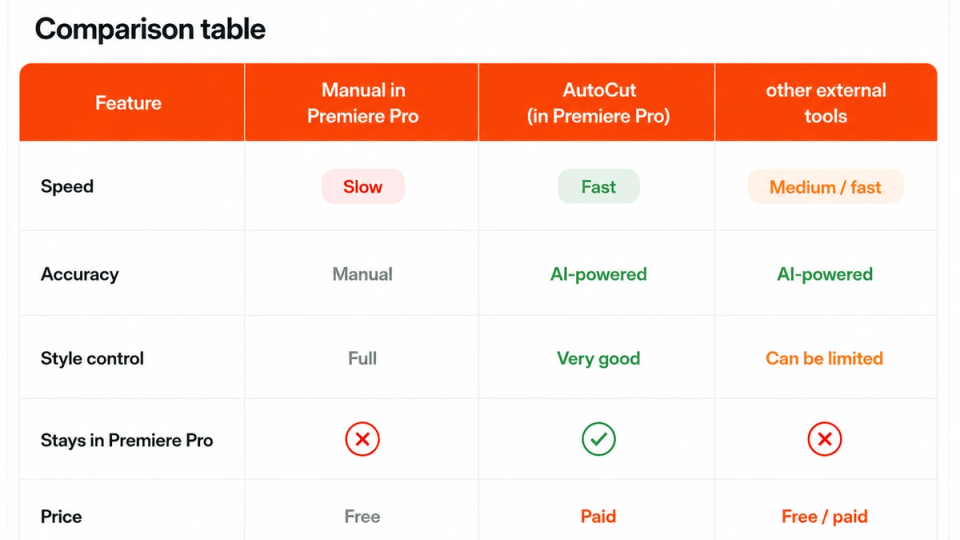
Comparison Table
Before going into more detail, here is a comparison table that outlines some of the key features of the three options for creating animated captions:
manual creation in Premiere Pro, using the AutoCut tool directly in Premiere Pro, and other external tools.
Alternatives worth mentioning
There are already several tools that essentially perform the same function and speed up the creation of animated captions.
Each has its own features, with its own pros and cons, but they all have one thing in common: they force you to leave Premiere Pro.
That means ending up editing the video, exporting it, uploading it to one of these programs, starting to work on the captions, and then exporting it again. Whereas with AutoCut, as mentioned, you have everything right within Premiere Pro.
It’s still worth mentioning a few of these alternatives so that everyone can draw their own conclusions and determine which solution works best for their workflow.
CapCut
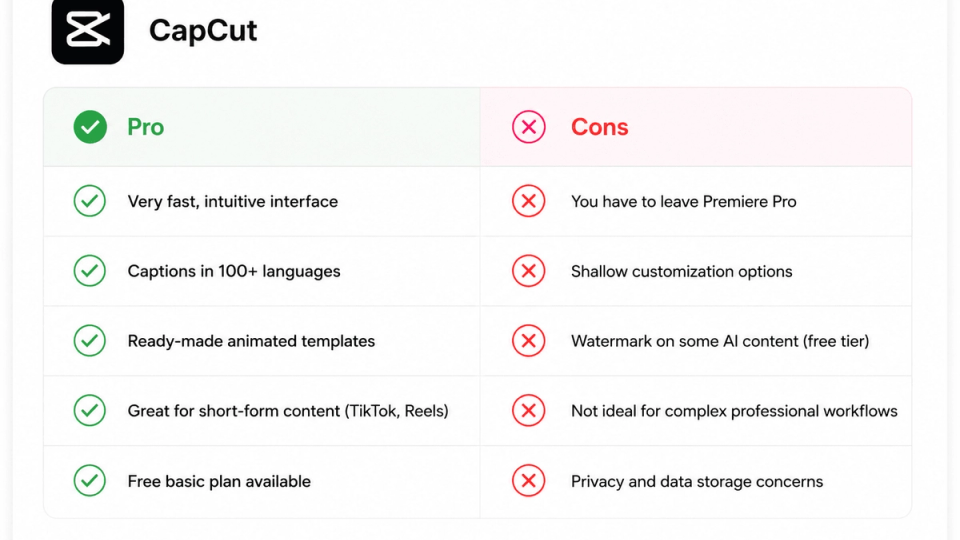
Let’s start with one of the best-known tools for this type of service: CapCut.
This solution is ideal for creators who don’t use or need Premiere Pro. The AI instantly generates subtitles in over 100 languages using predefined, ready-to-use models.
It’s a fairly simple tool to use, even for beginners, and in addition to the paid plan, it offers a free basic plan that includes full HD export and automatic subtitles, although watermarks may appear on some content.
The main limitation is the lack of customization, which is very limited compared to other professional editing software.
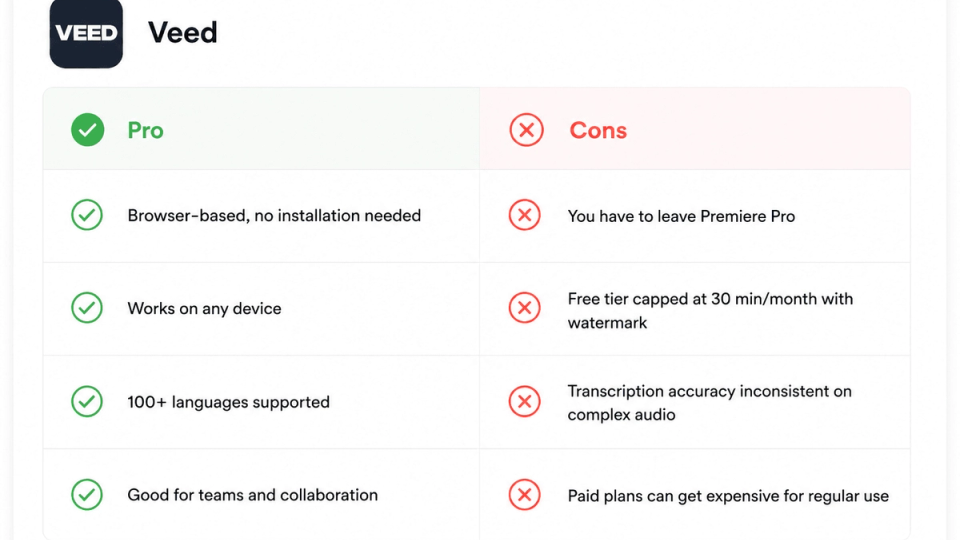
VEED.io
You don't need to install anything with VEED.io.
This tool is also a good option for anyone who wants to avoid using Premiere Pro.
Subtitles natively in Premiere Pro
Burnt-in subtitles created directly in Premiere Pro are a viable alternative if you need static subtitles.
The program allows you to transcribe in 13 languages and convert the transcription into subtitles in a simple and customizable way.
The main limitation, as we've seen throughout this article, is animation.
It's perfectly fine for longer, dialogue-heavy content. Less so for short social media content like TikTok and Instagram.
Without AutoCut support, for example, creatingthe word-by-word highlight effect, which is so popular on social media, becomes a rather time-consuming and cumbersome task.
Side-by-side comparison
Now that we have a slightly more detailed overview of some of the tools at our disposal, I’d like to summarize everything visually in a table to compare them in detail.
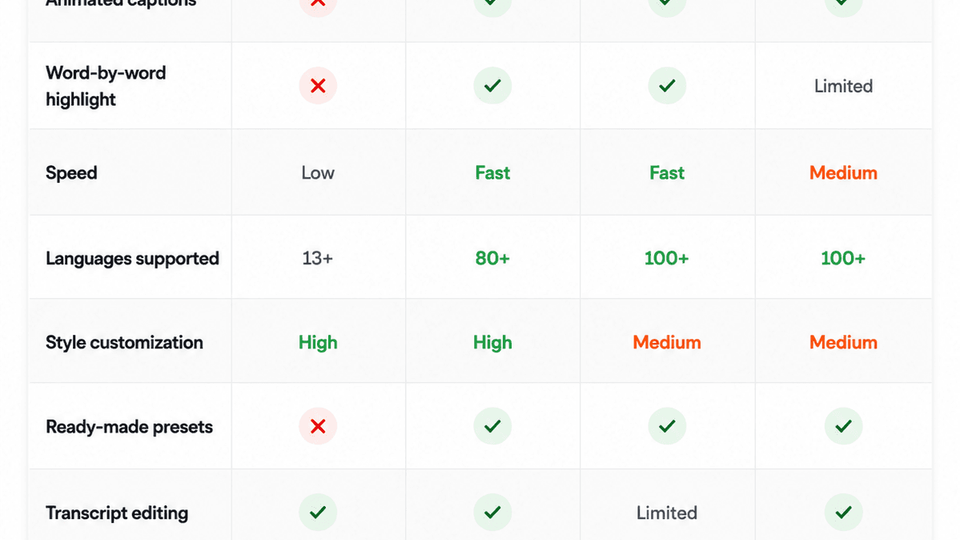
To wrap up: the two solutions mentioned (CapCut and VEED.io) are valid alternatives, but they require you to switch away from Premiere Pro.
And for those who, like me, primarily use this editing software, you also have to take into account the time lost between exporting, importing into another program, creating subtitles, and re-exporting the final result. As we all know, time is precious for a creator.
I therefore believe that AutoCut is the perfect solution if you want social media-style animated captions with word highlights without having to leave Premiere Pro.
Methodology
All comparisons, screenshots and performance observations presented in this article are based on internal testing conducted by the AutoCut team on July 11, 2026, using the latest publicly available versions of the software at the time of testing. As these products are continuously updated, features, pricing, user interfaces, and performance may change after publication. This article reflects our findings at the time the tests were performed.
FAQ
Not natively. Premiere lets you automatically generate static subtitles from a transcript usingthe Speech-to-Text feature. However, this method will only quickly produce static subtitles, which are fine for slightly longer content but generally not suitable for social media.
If, on the other hand, you want animated captions, meaning subtitles with effects, animation, and/or words that highlight one by one during speech, then you have two options: you can do it manually, though it takes a bit of time, or you can install a plugin like AutoCut, which, with its AutoCaptions feature, adds this functionality directly to Premiere Pro without having to open any external programs. All in one place.
The standard subtitles you can create automatically right in Premiere are static and appear in sync with the spoken dialogue, but they don’t have any effects or movement. Animated captions, on the other hand, add movement to the text and can apply various effects that follow the rhythm of the text: animations, color changes, or highlights when a single word is spoken.
Thanks to AutoCut AutoCaptions, this feature is now available directly in Premiere Pro.
Not at all. Once you’ve downloaded the plugin HERE and installed it, simply link it to Premiere as an extension. Go to Window > Extensions > AutoCut. In the program window, click on AutoCaptions, select the audio track you want to transcribe, choose the language or import an SRT file, then select one of
the available presets to customize the style, and finally generate the subtitles.
The entire process takes less than a minute if you’re working on short clips, which is a far cry from the time we estimated earlier for manually creating animated captions for a one-minute video (about 20–30 minutes).
No, AutoCut is a paid tool, but it offers a 14-day free trial to give you a chance to test it out and decide whether to invest in it. It offers several paid plans depending on your needs, but they’re all quite affordable. Plus, just think about all the time it saves you compared to having to do everything manually or switch back and forth between different programs: it’s clear that the investment is well worth it. You can check out the plans HERE
Yes, and that’s also what sets this plugin apart from its competitors. You can choose from a selection of presets, inspired by the styles of popular creators, and then customize the font, color, text box, padding, animation type, and highlight color. You can also save your preferred style as a preset so you can easily use it for future content if you want to maintain a recognizable, consistent style.
AutoCut currently supports over 80 languages for transcription and animated caption generation. As shown in the workflow above, after selecting your audio track, the second step in the plugin interface is choosing the video language from the supported list.
Yes. Everything AutoCut does is native to Premiere Pro, just as if a video editor had done it manually. As explained earlier in the article, you can double-click the subsequence that has been created to edit it. Since it uses native text and shapes, you can easily customize it.
Myriam HINDERER
Chief Marketing & Communication Officer